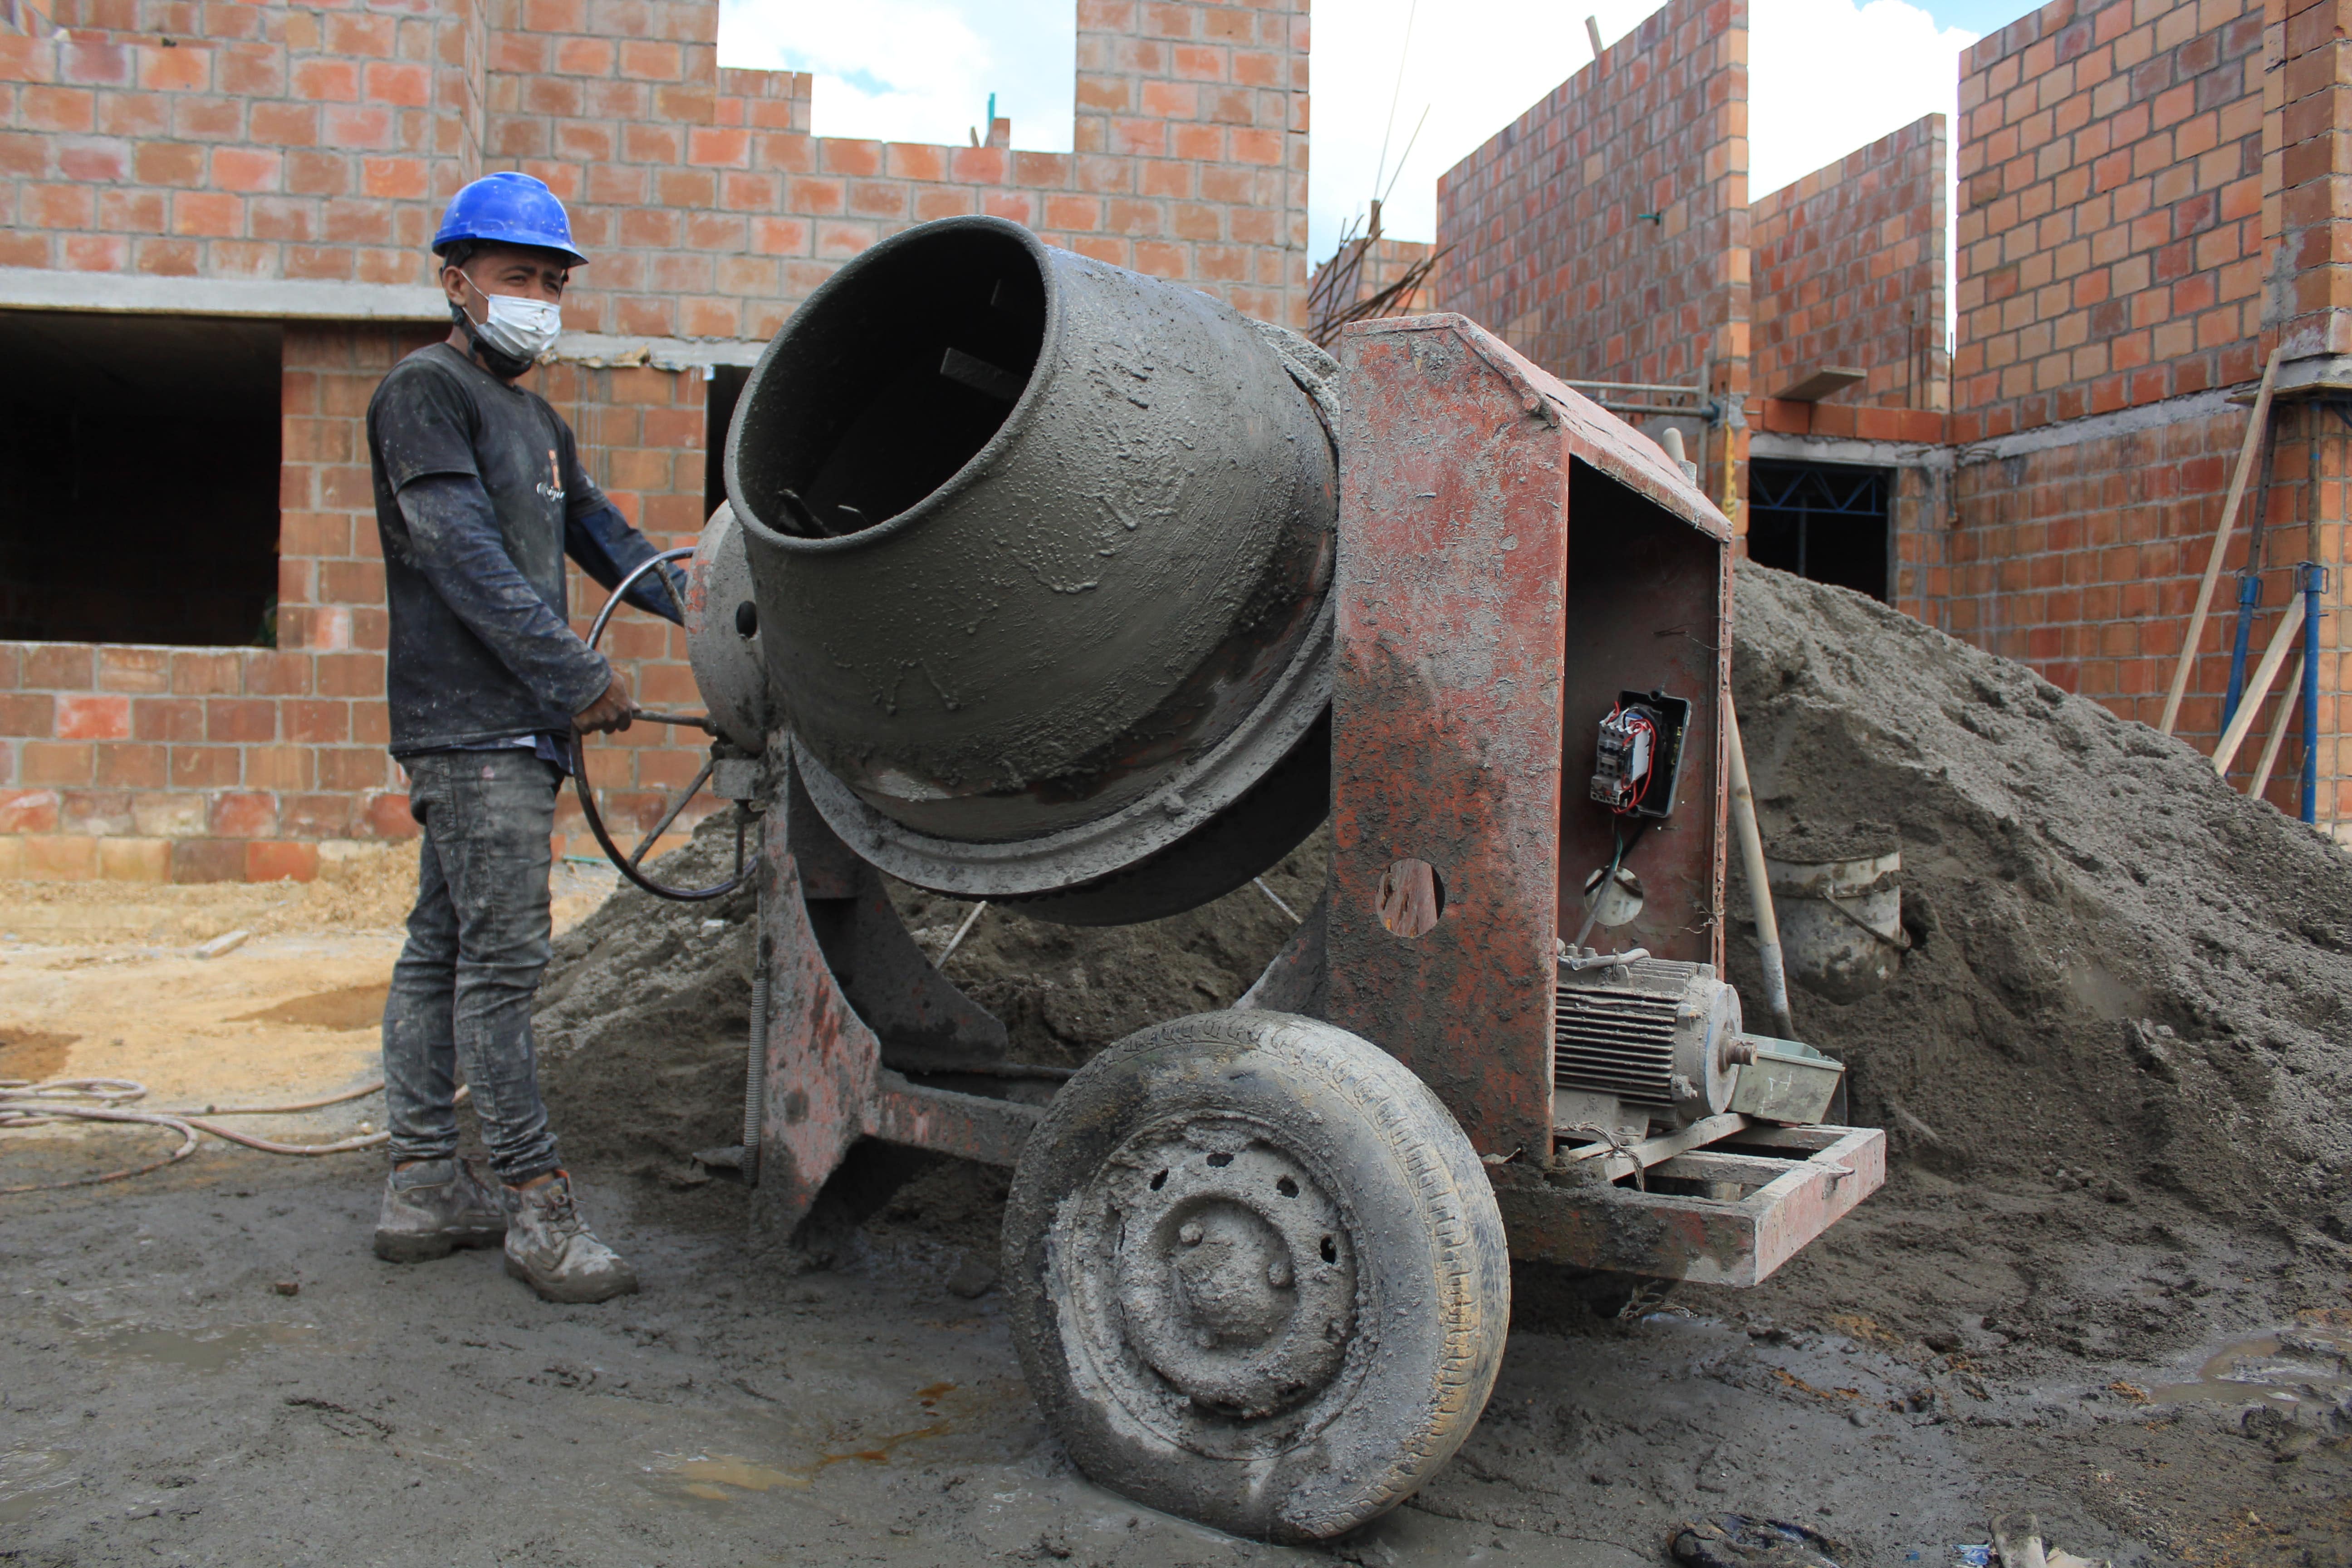
What is Cement in Construction?
Building blocks of stones or bricks are to be bonded together to build a structure. Mud, lime, and cement are binding materials. Nowadays, cement is used very commonly as a binding material since it is more reliable.
Cement is obtained by burning a mixture of calcareous materials like lime and argillaceous materials like clay. It was first produced by Joseph Aspidin, a mason from England. As its color resembled a variety of sandstone found in Portland, England, it was patented as Portland Cement (1842). South India Limited established the first cement factory in Chennai, India. Today, India has more than a hundred large cement plants and many more small ones. In 2011, the Aditya Birla Group alone produced more than 52 million tonnes of cement in India. (Source: Material of Construction, By S.S. Bhavikatti)
Types of Cement in Construction
Cement is available in natural form in some places in the world, but in most places, it is manufactured artificially.
Natural Cement
Natural cement can be made by burning and crushing limestone that contains 20 to 40% clay. Depending upon the clay content, it sets quickly or slowly when mixed with water. It is brown. Its strength is not so high. However, natural cement is not used in India. The best variety of natural cement is known as “Roman cement.“
Artificial Cement
Raw materials for producing cement are argillaceous (clay) and calcareous (lime). The raw materials are mixed in suitable proportions and burnt at a temperature of 1400° C to 1450° C to a partial fusion state. It results in a granular material known as clinker. Then, in ball mills, the clinker is ground to produce material of the required fineness, which is known as cement. (Source: Material of Construction, By S.S. Bhavikatti)
Properties of Cement
- The important properties of cement are:
- It is greenish-grey in color.
- It is a smooth powder.
- When mixed with water, it sets, producing heat.
- It is easily workable.
- While setting, it binds the adjoining materials.
- It possesses good plasticity.
- It hardens early.
- It offers good resistance to moisture. (Source: Material of Construction, By S.S. Bhavikatti)
Functions of Ingredients of Cement
The chemical composition of ordinary portland cement(OPC) is as shown in the table below.
Composition of OPC
| Ingredient | Content(%) | Range(%) | |
| Lime | CaO | 62 | 60-67 |
| Silica | SiO2 | 22 | 17-25 |
| Alumina | AL2O3 | 5.5 | 3-8 |
| Iron Oxide | Fe2O3 | 3.0 | 0.5-5.0 |
| Calcium Sulphate | CaSO4 | 3.5 | 3-4 |
| Magnesia | MgO | 2.0 | 0.1-3.0 |
| Sulphur Trioxide | SO3 | 1.0 | 1-3.0 |
| Alkalis | 1.0 | 0.4-1.3 |
The functions of the ingredients of cement are:
Lime: It imparts strength to cement. However, if added in excess, it makes cement unsound and causes disintegration.
Silica: Silica provides strength to cement due to the formation of dicalcium and tricalcium silicates. However, excess silica prolongs the setting time of cement.
Alumina: It imparts a quick-setting property. If used in excess, it weakens the cement.
Iron oxide: It provides colour, hardness, and strength. It helps the fusion of raw materials also.
Calcium sulphate: Calcium sulphate, in the form of gypsum, increases the initial setting time.
Magnesia: It provides hardness and colour. If in excess, it makes cement unsound.
Sulphur trioxide: It should be in small quantities. If it is in excess, it makes cement unsound.
Alkalies: This is a chemical impurity. If in excess, it causes efflorescence and staining.
(Source: Material of Construction, By S.S. Bhavikatti)
Setting and Hydration of Cement
Hydration occurs when water is introduced to cement. Plasticity is lost as a result of hydration. The first setting time is the time it takes from the addition of water until the cement loses its ductility. The ultimate setting time is the period between the addition of water and the total loss of flexibility. A lot of heat is released during hydration. One gramme of OPC contains around 120 calories, 80 of which are released in the first seven days. The hydration phase lasts more than a year. As it hydrates, cement binds inert elements it comes into touch with, such as sand, coarse aggregate, brick, stone, and so on. Finally, it generates hard mass.
The OPC consists of the following chemical compounds:
Tricalcium silicate 3CaO . SiO2 (C3S) 40%
Dicalcium silicate 2CaO . SiO2 (C2S) 30%
Tricalcium aluminate 3CaO . AL2O3 (C3A) 11%
Tetracalcium alumino ferrite 4CaO . AL2O3 Fe2O3 (C4AF) 11%
It also contains small quantities of impurities like calcium oxide (CaO) and magnesium oxide (MgO).
When water is added to the cement
C3A is the first to react and set up. It generates a lot of heat.
C3S hardens early and develops strength in the first 28 days. It also generates heat.
C2S hydrates slowly and increases strength over a year and contributes to ultimate strength.
C4AF is a comparatively inactive component. (Source: Material of Construction, By S.S. Bhavikatti)
Tests on Cement
The tests to be conducted to verify the quality of cement may be grouped into the following two categories:
Field Tests
For a quick assessment of the quality of cement, field tests may be conducted. Such tests are used for minor repairs only. For all major papers, one should go for laboratory tests. The following are the suggested field tests:
- Examine the cement in the package. The color should be a consistent greenish-grey. There should be no obvious lumps.
- Check for lumps by putting your hand deep into the bag. There should be no lumps in good cement.
- Take a tiny amount of cement and rub it between your fingers. It should not evoke any negative emotions in you.
- Place a handful of cement in a bucket of water. After floating for a bit, the particles should settle. No particle should float indefinitely.
Laboratory Tests
IS:269-1976 prescribes a procedure for conducting tests on cement in laboratories. They are briefly explained below.
Fineness Tests
The test for fineness is conducted by sieve analysis or by finding the specific surface area.
Sieve Analysis
100 grams of cement are sieved through IS Sieve No. 9 for 15 minutes. The residue retained on the sieve is then weighed. This residue should not be more than 10 gm.
Finding Specific Area
This is determined by conducting Blaine’s air permeability test. IS: 4031-1968 prescribes the procedure for the test. The test is based on the principle that the rate of flow of air through a bed of cement is proportional to the surface area of the particles of cement. For this, Blaine’s air permeability apparatus is used. The surface area determined should not be less than 2250 cm³/gm.
Setting Time
As already explained, initial setting time is the time interval between the addition of water and the time cement starts losing plasticity. The mortar for concrete made with cement should be placed in its final position before the initial setting time. The final setting time has been defined as the time interval between the addition of water and the end of the plasticity of cement. The cement product should not be disturbed before the final setting time is reached, which is 600 minutes (10 hours). The test is to be conducted as per the procedure laid down by IS: 269-1978. Before testing for setting time, the quantity of water to be added should be determined by a standard consistency test.
Standard Consistency Test:- It helps in determining the quantity of water to be added to produce the cement paste.
Initial Setting Time Test:- The amount of time it takes for a cement-water mixture to lose its plasticity. The code specifies that it should be at least 30 minutes.
Final Setting Time Test:- The time interval between the end of the experiment and the addition of water to the paste is to be reported as the final setting time. The final setting time should not be more than 9 to 10 hours.
Soundness Test
Soundness is the ability of hardened cement paste to retain its volume after it has been set. The test procedure is as given below:
- Properly oil and place the Le Chatelier apparatus on a glass plate.
- Fill the mould with cement paste made with 0.78 times the water required for standard consistency. Even out the top.
- Cover the mould with another glass plate and place a small weight on it.
- Immerse the whole assembly under water for 24 hours, and ensure the temperature of the water is maintained at 27°C 2°C.
- Boil the water for an hour and allow it to cool. Measure the distance between the two indicators.
- If the increase in distance between the two indicators is less than 10 mm, report it as sound.
Compressive Strength Test
Compressive strength is an important property of cement since cement products are mainly subjected to compression. The procedure is as given below:
- Dry mix 200 gm of cement with 600 gm of standard sand thoroughly.
- After adding P/4+3 percent water by weight, mix thoroughly for 3-4 minutes, where P is the standard cement consistency.
- Place the mix in a cubical mould with a diameter of 70.6 mm, which gives an area of 500 mm2 on each face. While filling the mould, the mortar is rodded with a 25 mm steel rod 20 times in 8 seconds.
- Place the mould over a vibrating machine that vibrates at the rate of 12000+400 times per minute. While vibrating, any additional mortar required is filled with a hopper.
- Remove the hopper after vibrating for two minutes and level the top with a knife.
- After 24 hours, the mould is removed and the cube is placed under clear water.
- Carry out tests on mortar cubes at 3 days, 7 days, and 28 days. For each set, 3 cubes are required.
- Cubes are tested in compression testing machines by placing them between two 6 mm plywood boards and applying a compressive load to each specimen separately.
- report the overage strength of 3 specimens as the strength of the cement at the age when tested.
- The strength requirements of various grades of cement at 3, 7, and 28 days of age, as recommended by the IS code, are listed below:
Compressive strength of cement in N/mm2
| Age | Grade 33 | Grade 43 | Grade 53 |
| 3 Days | 16 | 23 | 27 |
| 7 Days | 22 | 33 | 37 |
| 28 Days | 33 | 43 | 53 |
Manufacture of Ordinary Portland Cement
The manufacturing process of cement may be divided into the following three stages:
Mixing Raw Materials
The chemical composition of calcareous and argillaceous materials to be used is determined in the laboratory, and the exact proportion in which they are to be mixed is also determined. The raw materials are crushed separately to 18 mm downsize using crushers provided with 18 mm grills and stored in separate bins. The size of the storage bins varies from 3 to 4.5 m in diameter and 18 to 24 m in height. There are two methods of mixing the two materials, viz., the wet process and the dry process.
Wet Process
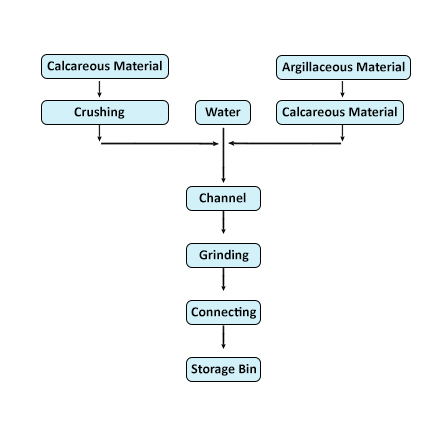
In this method,
- A regulated quantity of the raw material is allowed to drop into the channel.
- A requisite quantity is also mixed in the channel, which takes the mixture to a wash mill. The wash mill is a thick and heavy cylinder of 2.5 to 3.0 m in diameter and 9 to 12 m in length, which is kept slightly inclined horizontally and can rotate at a speed of 15-20 revolutions per minute. The cylinder is provided with steel balls.
- The raw material is fed at the raised end and the wash mill rotates. During rotation, the steel ball pounds the raw materials and reduces them to the required fineness.
- The intimate mixture in the form of slurry, exiting at the lower end through a screen, is stored in a tank. The storage tank is provided with a system of continuously operated rakers and hanging chains to avoid settlement.
- The slurry from the storage tank is pumped into silos and its chemical content is tested. Corrections, if required, are made by adding a slurry of argillaceous material or calcareous materials, and then the corrected slurry is stored in a separate silo. The flow chart of the above process is shown in Fig. 2
Dry Process
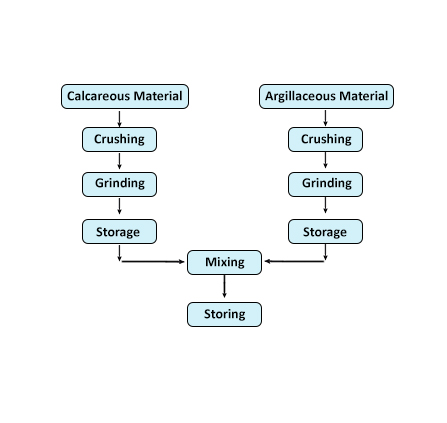
The ultimate product of this operation is dry powder.
- Calcareous and argillaceous materials are crushed and processed to powder separately before being kept in separate bins.
- The chemical makeup of the two components is examined, and the appropriate quantity of the two ingredients is drawn to achieve the desired blend. The appropriate dry mix is kept in a separate silo. Figure 1 depicts the process flow chart.
Burning
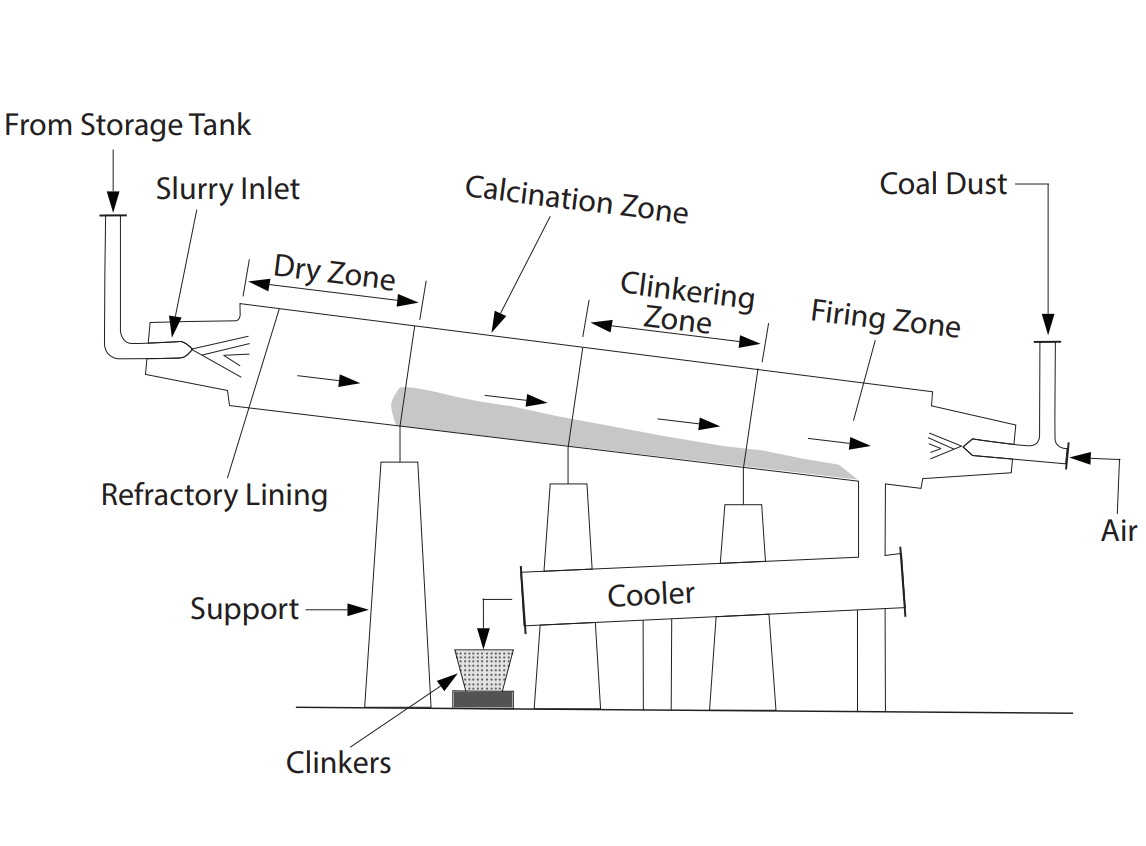
The burning process takes place in a rotating kiln (Fig. 1.5), which is a steel tube with a diameter of 2.5 to 3.0 m and a length of 90 to 120 m. It is supported by concrete columns at an angle of 1 in 25 to 1 in 30. The kiln is set up to revolve at a pace of 1 to 3 revolutions per minute. A refractory liner is installed on the inside of the steel drum.
The adjusted feed enters the kiln from the higher end, while hot gases are blasted through the lower end. The temperature can reach 1400°C to 1500°C at the lower end, while it is lower at the upper end.
- When the drum is rotated, the feed gradually rolls down from a lower to a higher temperature zone. The following actions take place:
Dry zone Calcination zone Clinkering zone Firing zone (See Fig. 3)
Grinding
In ball mills or tube mills, the clinkers are reduced to fine powder. Approximately 3 to 4% gypsum is added during the grinding process to guarantee that the first setting time is around 30 minutes.
The cement is ground clinker, which is transported to the storage silo by elevators.
The cement is extracted from the storage tank and bagged. This is accomplished through the use of automatic weighing and packaging devices. (Source: Material of Construction, By S.S. Bhavikatti)
Storage of cement
- Cement absorbs moisture from air and hydrates, which results in a loss of strength. Heat and humidity accelerate hydration. Hence, the following precautions should be taken for storing cement:
- To protect it from the sun, wind, and rain, cement should be stored in a covered chamber. Doors and windows should only be opened while the staff is present. It is best to keep doors and windows as small as possible.
In the storage chamber, a raised platform should be built; cement should not be kept directly on the floor. - During the wet season, cement should not be kept.
- The storage duration should be kept as short as possible.
- When pulling out cement bags for usage, the first-in, first-out rule should be followed.
- The drainage system on the roof and surrounding the storage shed should be carefully maintained. (Source: Material of Construction, By S.S. Bhavikatti)
Types of cement and their uses
The cement of the following types are manufactured to meet the various needs of their uses
1. Ordinary Portland Cement (OPC)
- 33 grade OPC
- 43 grade OPC
- 53 grade OPC
2. Portland Pozzolana Cement (PPC)
3. Fly Ash Cement
4. Blast Furnace Slag Cement
5. Acid Resistant Cement
6. Sulphate Resistant Cement
7. High Alumina Cement
8. Quick Setting Cement
9. Rapid Hardening Cement
10. Expanding Cement
11. Low Heat Cement
12. Hydrophobic Cement
13. White Cement
14. Coloured Cement
(Uses of each type of cements will be added in the coming days) (Source: Material of Construction, By S.S. Bhavikatti)
Cement Products
The following are some of the cement products available on the market.
- Hollow and solid cement block R.C.C. door and window frames
- Ferrocement products like cupboards, benches, and roadside sign plates
- Grills, R.C.C. moulds, and design pillars
- Tiles for walls and flooring
- Manhole covers
- R.C.C. spun pipes
- A.C. sheets and pipes.
- Precast electric poles

